My grade 5s had a great time debating and presenting their political platforms as our cumulative task for our Government and Citizenship Inquiry. I have already post a ton of items on how we gathered our background information and asked questions about this topic, so this post will look at the rest of the inquiry steps we took to complete the project.
STEP ONE - BACKGROUND INFORMATION AND QUESTIONING
This first step I found to be really important with my Grade 5s, because they did not have a lot of knowledge about our government system and how political parties work. Most importantly, we really needed to understand what a political platform is and how different aspects of a platform appeal to certain people, and not others in the same province and/or country. Learning that different people have different biases and interests was integral to the next part of our project.
STEP TWO - GATHERING AND ORGANIZING INFORMATION
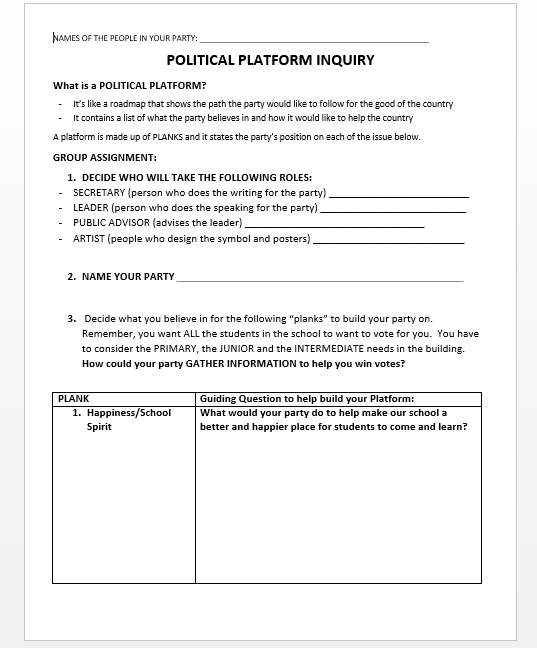
With the above information in hand, I gave the students their assignment. They were put in groups of 4 and their job was to create a political party and platform that would work in our school environment. Their projects consisted of the following elements:
1. Create a party name and logo.
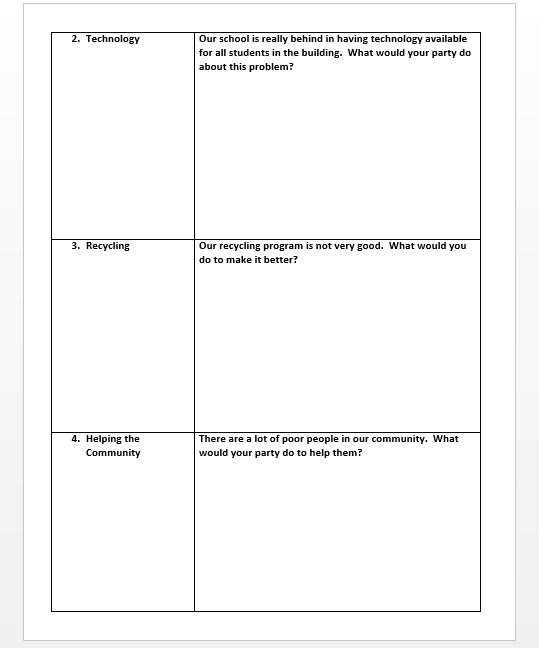
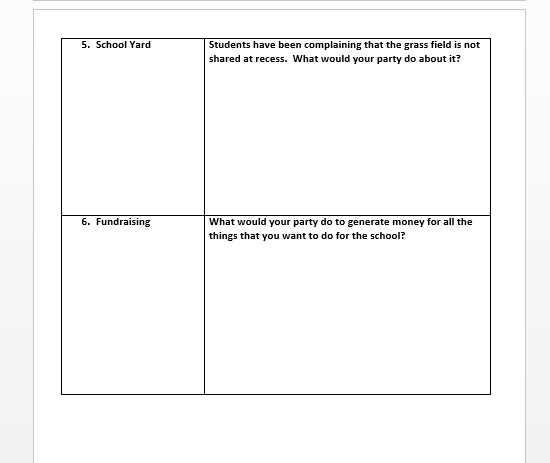
2. Create a 6 plank political platform that would appeal to the students in our school at all grade levels.
3. Take into account how you would raise money for your party's ideas.
4. Present your platform in a SWAY presentation - and everyone has to be a part of the presentation.
5. Be prepared for a party debate where other parties will try to poke holes in your platform!
While they were working I assigned different roles based on different learning needs - a secretary, an art consultant, the leader of the party to make sure they were on task, etc. I also gave groups an outline to work with based on questions that we co-created when the project was introduced. The full outline is available in the Social Studies and Science Live Binder (the link is at the top of this webpage):
STEP ONE - BACKGROUND INFORMATION AND QUESTIONING
This first step I found to be really important with my Grade 5s, because they did not have a lot of knowledge about our government system and how political parties work. Most importantly, we really needed to understand what a political platform is and how different aspects of a platform appeal to certain people, and not others in the same province and/or country. Learning that different people have different biases and interests was integral to the next part of our project.
STEP TWO - GATHERING AND ORGANIZING INFORMATION
With the above information in hand, I gave the students their assignment. They were put in groups of 4 and their job was to create a political party and platform that would work in our school environment. Their projects consisted of the following elements:
1. Create a party name and logo.
2. Create a 6 plank political platform that would appeal to the students in our school at all grade levels.
3. Take into account how you would raise money for your party's ideas.
4. Present your platform in a SWAY presentation - and everyone has to be a part of the presentation.
5. Be prepared for a party debate where other parties will try to poke holes in your platform!
While they were working I assigned different roles based on different learning needs - a secretary, an art consultant, the leader of the party to make sure they were on task, etc. I also gave groups an outline to work with based on questions that we co-created when the project was introduced. The full outline is available in the Social Studies and Science Live Binder (the link is at the top of this webpage):
My students gathered data by collecting the opinions of other students in our school through surveys and created graphs as a data management tie-in. They worked independently for the most part during this time, and our Teacher Librarian was kind enough to give them some direction and prepare them for debate questions that other parties might ask.
I had final approval of their rough work before they began their Sways, and I read their platforms several times and left sticky notes as feedback for them to help guide students along the way.
I had final approval of their rough work before they began their Sways, and I read their platforms several times and left sticky notes as feedback for them to help guide students along the way.
STEPS THREE and FOUR -
INTERPRET AND ANALYZE/EVALUATE AND DRAW CONCLUSIONS
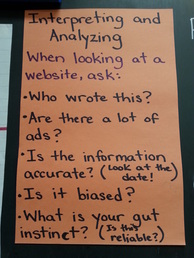
There was a lot of both of these steps that we took along the way - when students were gathering information, they had to interpret and analyze their findings. Some used a great graphing tool called Create a Graph https://nces.ed.gov/nceskids/createagraph/ that allows anyone to create, save, and print a graph online. Also, any website information that was gathered had to be interpreted according to our guidelines (see picture on the left).
I asked the students to really look at their platforms and evaluate their ideas. We used the following question to help guide our thinking:
1. Will this REALLY work in our school if we wanted to start it tomorrow? Why or why not? Can you make this idea easier to implement?
With this as our guideline, once their platforms were approved we moved on to the final step.
STEP FIVE: COMMUNICATE AND PRESENT
This step was the most fun. I had students set up on shared Sways (a presentation tool in Office 365) and away they went. Students could work simultaneously and their work was automatically saved. They took and inserted pictures of themselves and their party logos, and prepared for their debates.
Our debate format was simple: a party would present, each of the opposing parties could ask one question per party, and there was time for one rebuttal for each response. I was the facilitator and the classes we invited to watch were able to ask questions at the end. It was a ton of fun, especially right before Christmas because the parties handed out treats to try to gather votes, and then we did a real democratic vote at the end.
The project took about 4-6 weeks to complete from start to finish, and we used some language periods and all their social studies periods. I would do it again in a heartbeat. It was so much fun to watch my students learn and grow with this inquiry.
A FINAL NOTE ON ASSESSMENT:
I triangulated my data for this assignment. I had conversations with each political party, and kept track of how well they were a) following instructions, b) working together and c) understanding how their learning could apply to this project. One group went so far as to make up questions that they thought other parties would ask, so that they would have answers ready ahead of time.
I also gathered anecdotal observations by just walking around and listening in on how the parties were interacting with one another as well as listening to how their ideas were taking shape.
Lastly, from their presentations I gathered many marks. I marked their Sways, their oral presentations, their ability to question other parties, and their ability to present together as a team.
Maria
INTERPRET AND ANALYZE/EVALUATE AND DRAW CONCLUSIONS
There was a lot of both of these steps that we took along the way - when students were gathering information, they had to interpret and analyze their findings. Some used a great graphing tool called Create a Graph https://nces.ed.gov/nceskids/createagraph/ that allows anyone to create, save, and print a graph online. Also, any website information that was gathered had to be interpreted according to our guidelines (see picture on the left).
I asked the students to really look at their platforms and evaluate their ideas. We used the following question to help guide our thinking:
1. Will this REALLY work in our school if we wanted to start it tomorrow? Why or why not? Can you make this idea easier to implement?
With this as our guideline, once their platforms were approved we moved on to the final step.
STEP FIVE: COMMUNICATE AND PRESENT
This step was the most fun. I had students set up on shared Sways (a presentation tool in Office 365) and away they went. Students could work simultaneously and their work was automatically saved. They took and inserted pictures of themselves and their party logos, and prepared for their debates.
Our debate format was simple: a party would present, each of the opposing parties could ask one question per party, and there was time for one rebuttal for each response. I was the facilitator and the classes we invited to watch were able to ask questions at the end. It was a ton of fun, especially right before Christmas because the parties handed out treats to try to gather votes, and then we did a real democratic vote at the end.
The project took about 4-6 weeks to complete from start to finish, and we used some language periods and all their social studies periods. I would do it again in a heartbeat. It was so much fun to watch my students learn and grow with this inquiry.
A FINAL NOTE ON ASSESSMENT:
I triangulated my data for this assignment. I had conversations with each political party, and kept track of how well they were a) following instructions, b) working together and c) understanding how their learning could apply to this project. One group went so far as to make up questions that they thought other parties would ask, so that they would have answers ready ahead of time.
I also gathered anecdotal observations by just walking around and listening in on how the parties were interacting with one another as well as listening to how their ideas were taking shape.
Lastly, from their presentations I gathered many marks. I marked their Sways, their oral presentations, their ability to question other parties, and their ability to present together as a team.
Maria
